Last Updated: February 14th, 2020
Setting your white balance in camera can enhance your photographs in significant ways.
While imperfection in this camera setting is more easily corrected in post processing, when handling a large number of photographs from the same shoot – having your setting consistent will make for, you guessed it, more consistent images straight out of camera; and an easier editing time (if this is something you want to do).
Our initial foray into the world of white balance began by utilizing our camera’s built in auto white balance mode. This is entirely an option, but for users who want to have more control and freedom to create the images they envision in their minds – learning how to set the white balance yourself by getting to know the Kelvin temperature scale will go a long way.
In this article, we are going to discuss auto white balance (some pros and cons), as well as the standard white balance modes you can expect to find on just about any digital camera. At the end, we’ll talk more about the Kelvin scale – which will specifically apply to those of you with a camera body (often pro level) that allows you to set the specific white balance reading yourself.
Auto White Balance – An Easy Option
The simplest solution to setting white balance in your photography is simply using auto white balance (AWB). As the name implies, this is the mode where your camera itself determines the optimal white balance for you. As with anything done by a computer, your mileage here will vary depending on the specific camera you are using and what you are expecting from the results.
In our experience with the Canon line of cameras (from the budget Canon Rebel to the Canon 5D Mark IV’s we currently use), the auto white balance is actually quite good. Our struggles with this mode came more into play as we began to shoot more-and-more for clients, having sessions and weddings comprising of hundreds of photos. For the purpose of consistency, auto white balance started to not cut it – or at least made it more difficult when editing photos later.
Depending on your specific needs, learning about white balance from a more technical standpoint may not be entirely necessary, but if you are in a similar position as us – it may be integral to producing the quality images you want with more speed and efficiency.
Other Preset White Balance Modes
If you are not quite ready to select your own Kelvin temperature in camera, or don’t have a camera body capable of this function, getting to know the other white balance modes your camera has can help to get more control over your images compared to auto white balance. For most users, a preset mode like these will suffice for many shooting situations – and at worst will put all of your images in a closer ballpark (so to speak).
These preset white balance modes are:
-
Daylight/Sunny (symbol – a sun with light rays) is the mode used on sunny days and under clear skies. This helps to account for the naturally warm tones often found during mid-day.
-
Cloudy (symbol – clouds) is used on days when it is cloudy, and tends to have the effect that images will feel a little warmer.
-
Shade (symbol – house with diagonal lines stretching to the ground) has similar qualities to the cloudy WB mode, and as the name implies, would most often be used while shooting in shaded areas.
-
Flash (symbol – jagged arrow pointing down) is designed to be used while shooting with flash to add some warmth to compensate for the often cold flash-light.
-
Tungsten (symbol – household lightbulb with light rays) is designed to be used when incandescent light sources are present to remove the yellow or orange color cast.
-
Fluorescent (symbol – horizontal line resembling a fluorescent tube with light rays) is great when shooting in environments that have fluorescent light as this mode can remove the blue or green color casts in your image.
Shoutout to LifeWire for providing a great basis for this.
Advanced White Balance Settings
The area where you will find you have the most control over your camera’s white balance is here. While sometimes more advanced use cases can be a bit daunting for people, we have come to find that, of all the technical aspects of operating a camera – understanding white balance is actually pretty straightforward.
The reason for this is because white balance operates independently from other settings on your camera. This is unlike learning about shutter speed, aperture, and ISO – which while you might understand them on their own, it is more challenging to understand how they work together.
In this area of our discussion on white balance photography, we’re going to discuss the two advanced options available to you:
-
Custom White Balance (symbol – two triangles on their side with a square in the middle) is an advanced mode that allows you to set your white balance by using a reference image you can take of a white balance card.
-
Kelvin (symbol – K in a rectangle) provides the purest amount of control over your image, and is best suited if you would like to naturally shoot in such a way that doesn’t have a perfect neutral white OR if you don’t have time to set a custom white balance.
Now, we’ll look at both of these in more detail.
How to Set Custom White Balance
Setting your white balance by using the white card or gray card method is a route many pro photographers go. This is especially useful when you are looking for an image in camera that correctly mimics the actual color temperature of what is being photographed. For photojournalism where accuracy is key, this can be an invaluable tool.
If you don’t have a white balance card, we suggest you pick one up. With this and your trusted camera in hand, the steps for setting a custom white balance is pretty simple – and soon can become second nature.
-
Set the camera to Auto White Balance (AWB).
-
Place the white balance card in front of your subject.
-
Get close to the white balance card as the photograph you will take needs to have the frame filled with this card for accuracy – depending on the lens you are using, you may need to switch to manual focus mode to make this work.
Note: correct focus is not actually necessary, so if you can’t lock your focus on – you will still have the same result.
-
Take the picture. Make sure the exposure looks good, and that the card fills the whole frame. If this is right, you can move on (otherwise – reshoot).
-
On top of your camera, change the white balance mode to Custom White Balance.
-
Now, take a picture of your subject. You should notice a change in the images color to be more accurate to the scene.
A Consideration to Think About When Using Custom White Balance
Setting custom white balance is pretty straightforward if you follow the steps correctly.
But, even if you have done everything correctly, you still might not be entirely happy with the end result of the image.
One of the biggest reasons for white balance challenges stems from working in environments with multiple light source types.
For example, shooting outdoors during blue hour with incandescent lights in the background. The color casts of the blue skies and darker lighting environment contrasts pretty heavily with the warmer orange tones that come with this type of artificial lighting.
While setting the white balance using the card method might give you an accurate looking image, sometimes what is accurate can be boring or even unflattering. As we’ve experienced this exact scenario before, sometimes our artistic eye needs to overrule what is actually seen in the environment.
It is for this reason that we prefer setting our white balance manually – by working with the Kelvin option.
How to Set Your White Balance Using Kelvin
As we mentioned earlier in this article, the Kelvin temperature scale is really a valuable thing to learn as a photographer wanting to have total control over the white balance setting.
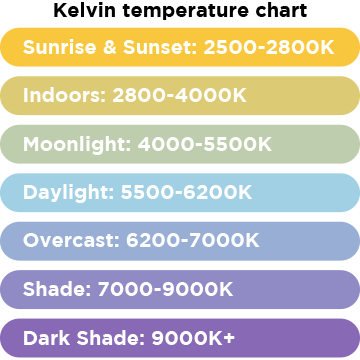
In our photography, since we don’t maintain total photo-realism – instead we opt often to have images that are warmer than the environment, having an accurate white balance is actually not the goal. Our goal is instead aiming towards consistency that suits our photography editing style. As many of our edits lean more towards the warmer side of things (there are of course exceptions depending on specific lighting and environment situations), we will choose a white balance setting based on a warmer Kelvin temperature. After setting the Kelvin, often in the area of 5500K – 6500K, we will quickly refer to our camera screens to see if we like the temperature.
For us, this is really the easiest approach, though many may consider it to be the most technically demanding – as it does require some working knowledge of the Kelvin temperature scale. Of course, when just starting around, carrying around a copy of the Kelvin scale makes it 10x easier. We’ve added a little chart here to help you out with this.
Conclusion
Getting the white balance right in your photography doesn’t have to be difficult.
For newbies, auto white balance will work for so many shooting situations. And for more advanced users, getting the perfect white balance by using white balance cards or just setting the Kelvin yourself is entirely an option.
While learning about white balance is often something that comes after learning about “the big 3” camera functions that make up The Exposure Triangle, it really plays a critical role to the look of your outputted images. In some extremes, it’s functions can even be pushed to unnatural color temperatures; while in more average cases, the goal will just be to replicate what is actually in front of the lens with accuracy (give or take a little extra warmth if you’re like us).